 Port Credit Marine Surveys & yacht delivery Society of Accredited Marine Surveyors  American Boat & Yacht Council |
MARINE SURVEY 101 How to inspect a boat, do your own marine pre-survey inspection and save money. Too often we do multiple surveys for the same buyer after finding major issues with the boats they had chosen. We always feel a little guilty taking someone's hard earned money when with a little bit of guidance they could have weeded out the obvious junk themselves. If our client is present when we find a deal killer, we suggest they forego the report and charge only for our time. If they are not available we have no choice but to complete the survey and charge full price. Reading this article will not make you a surveyor but depending on your aptitude, if you get even two or five or ten things out of this it could save you the cost of a survey. You are still going to have to hire a surveyor but hopefully only once. 95% of what we do is observation and 95% of my survey recommendations are based strictly on what we have observed rather than what we have actually tested with our various bits of equipment. Nothing in life or boats occurs independently, for every action there is a reaction, for every cause there is an effect and one must keep this in mind when "observing" a boat. Every issue you discover, every fault you find will be related to something else. Find an asymmetrically worn cutless bearing and it will be related to a stuffing box issue, find a stuffing box issue and it will likely be related to a motor mount or alignment problem. Our goal here is to show you how we look at things. Quiet patience and a camera are your best friends. All of the photos here are from our survey reports with the exception of one delamination shot, 3 rigging photos from my friend Jay Stormer of Dixie Land Marine and a tapered & straight threaded throughull photo from Marinehowto.com . All of these photos are titled and linked to their websites. |
| THE TOOL KIT - The tools required to perform a competent layman's inspection are found around most households. If you don't have a multimeter you can buy one for under $20.00. Suggested tools for your inspection - notebook, measuring tape, flashlight, small hammer (hard plastic or the brass head that we prefer), binoculars (for masts), small mirror, paper towels, multi-tool. something skinny and long like an ice pick (We use old dental tools) and a few wooden skewers or extra long coffee stir sticks (We poke these in coolant reservoirs to see if there is any rust, oil or mud in the bottom ). Your most important tool is the camera. Sharon takes all general photos when we arrive, exterior, interior, engine compartment, navigation equipment and electrical panels. For the balance of the inspection we keep the camera close at hand to photograph specific issues as discovered. Our tools (most of which you don't need) include all of the above plus a moisture meter, infrared thermometer, thermal imaging camera, magnet, magnifying glasses, waterproof snake camera, multi-meter, voltage tester, G.F.C.I. outlet tester, Barcol tester, corrosion meter and of course ear plugs. Should you choose to buy a moisture meter, the best on the market will cost you less than $50 but first read Moisture Meter Mythology. |
 |
Many of the systems and structural elements in a boat are so interrelated that you have to go back and forth numerous times trying to check something on the outside that is related to something on the inside that is related to an electrical component or seacock or whatever. For this excercise we'll take a geographical approach (as much as is possible). After identifying the boat we will look at the outside, inside, engine compartment then the AC and DC systems then sailboat rigging. |
|
| FIRST, IDENTIFY THE BOAT After finding the boat of your dreams resist the urge to jump in the car. First call the seller and ask the following questions. 1. Is this a fresh water boat ? - Regardless of the answer you should educate yourself about salt water boats and Buying a Hurricane Boat as a great many of these southern write offs find their way into our market here in Ontario. 2. What is the License Number ? - In 2006 the license format changed from the format shown in the left side of the photo to that in the right side. If the boat is a 2002 model with an ON license prefix ..... where was it between 2002 and 2006? This is a tip off that the boat was probably brought in from the US and may be a salt water or hurricane cover up job. This is far more common than you'd think. 3. What is the registered in the US) name & number ? if not licensed the vessel must be registered/documented and if that is the case you can get some information on registration and licensing at Is she licensed or Registered and what does that mean. |
 |
4. What is the hull identification number ? - This code can tell you who built it, when and where and for what model year and if there are recalls on the model. I find several codes every year that have been tampered with. It is fairly easy to change the model year of the boat, make a hurricane boat difficult to trace or just hide the fact that it is stolen. The upper code in the photo at right is a legitimate Sea Ray code. The lower (bogus) code was found on a Sea Ray stolen in Florida and sold in Canada. For a complete explanation on how to read these codes and uncover the bogus ones, check out What's a HIN ? To see if the USCG has recalls on your model go to USCG HIN and recall database Google the HIN. chances are nothing will come up but a couple of times I have had results showing the vessels were previously sold at salvage auctions. NOTE* Canadian "Registered Vessel" = "US Document Vessel" ... Canadian "Licensed Vessel" = US "State Registered" Vessel. |
 |
| OK ! Now that you are satisfied that you're
not spending good gas money to go look at
something that was repainted after being
clobbered by Katrina, Sandy or stolen in
Louisiana you are now ready to go look at
the boat. Take the whole family, kids, dogs,
neighbors dogs and that expert down the street
that knows everything about boats. Crawl
all over that thing, sit at the wheel and
imagine the peace of cruising the great briny.
See yourself stretched out in the cockpit
at anchor with a good book and a cold beer
..... Now get real ! Get all that stuff out
of your system and get critical. |
|
| THE EXTERIOR We like to start on the outside and work inwards remembering that flaws on the exterior will often be related to flaws inside. Look for the anomalies and take notes of every one. You will be astonished by what you can find with no more than a critical eye and a slightly cynical nature. First, look at the forest. Stand well back and have a walk around the boat. There is a very good chance that once they repair that damaged hull (at right) you will still be able to detect some hint of repair, a slight unfairness or a subtle change in colour. Even if the colour match is perfect when first done, repaired areas of gelcoat or paint will UV degrade at different rates over time and can be picked up by a careful eye. |
 |
Walk slowly around the boat and look at things from different angles.We often do this several times during a survey as some things become more evident as the light changes through the day. Look at the hull/deck joint and ensure that it is straight and fair, look for new sealant at the joint or overspray from paint or gel work. Now do the same thing with polarized sun glasses. I'm always surprised by what I can see with these. |
|
| What you can't see, with a little practice
you can hear. PERCUSSIVE SOUNDING - otherwise known as tapping with a hammer., note I said "tap", there is no need to be heavy handed. This is a simple process of noting the difference in sounds as you tap. A hollow sound may indicate delamination or core separation. A dull sound suggests high moisture content and a very dull sound suggests rotten core material. Anyone with a decent ear should be able to determine all but the most subtle conditions. A sound structure will produce a clean "click" with very little bounce back of the hammer. Delamination or core separation will give more bounce back (like a drum) and saturated core will produce a dull thud with near zero bounce back. It will take some practice but the feel of the "bounceback" is every bit as important as the sound ,,, eg. imagine hitting a snare drum vs. a base drum, the fell will be quite different. We prefer a brass head and have never marked a surface with them. You can buy the little ones shown at right at Princess Auto. This is a process you will use on every part of the structure and is critical on balsa cored hulls, I/O transoms and engine stringers. On decks tap around every fastener and fitting, paying particular attention to areas of hairline fracture in the gelcoat. Be aware that tapping on an area of the hull where a bulkhead is attached inside will produce a very hard click and that areas between interior frames will produce a very slightly duller sound. You probably will not find the more subtle differences but you can find the costly issues quite easily. |
 |
| An example - I/O boats more often than not
have wet transom core often after only a
couple of years in the water. The transom
is made up of a sandwich with FRP (fiberglass)
on both sides and plywood in between. The
cut-outs for the drives are never well sealed
from the factory and neither are all the
screw holes for trim tabs, depth transducers,
knot wheels or anything else that gets stuck
on there. A transom rebuild can cost $8K
and up ..... way up !. Fortunately dry, wet,
delaminated or even saturated wood produce
distinctly different sounds when tapped with
a hammer. If you don't want to mark the bottom
paint put some masking tape on the hammer.
Start tapping just below the water line at
an outside corner and work towards the drive.
You should hear a nice crisp ring with minimal
bounceback of the hammer. If you hear dull
thuds or get a pronounced bounceback you
are hitting wet or delaminated or even rotten
core as previously described. Sharon does all the percussive sounding and moisture metering on our surveys and notes that Moisture Meters tell a lot of lies. For structural conditions we rely more on our hammers but use the moisture meter as a second opinion and occasionally the thermal camera for a third opinion. This is not to say that these meters are of no value but it's important that you understand how they work (they don't measure moisture) and their limitations. Again I suggest Moisture Meter Mythology. |
Tap along the yellow line |
| The three photos below (all of same boat) taken over about 4 hours are perfect examples of the value of the walk around in differing light and at different angles. If you see a condition like this you may want to read Osmosis Testing. | ||
 Looking from the bow towards the keel we see what appears to be a fair and smooth bottom forward of the keel. |
 A little later, from the keel looking forward shows distinct 1" - 1 1/2" blisters not seen from the first angle. |
 Same as photo at left from a slightly shallower angle shows a very unfair surface indicative of major repair work. |
| Next boat ........ In the photo at far right you can see a slightly dark vertical line above the rub rail with the area to left of the dark line very slightly darker than the area to right. That is enough to cause a little suspicion. When you see something like this you want to take a closer look at the inside surface. The photo near right shows the same area from the inside. A significant impact that fractured above and below the rub rail had been quite well hidden by some patching on the outside without repairing the laminate at all. They didn't even replace the wood backing strip as seen by the protruding screw. I have polarized sunglasses that I frequently put on and off as I've found many flaws through the lenses that were invisible otherwise. As you walk around the boat, look up at the underside of the rub rail or toe rails, see a couple of feet of newer caulking or a gap between hull and rail. You must now get to that area on the inside of the boat and try to determine the cause. |
 |
|
| Next boat ..... Another example of a slow walk around the boat that reveals a keel that does not line up with the rudder This is a pretty clear indication that something is not kosher. At first look it seems that the rudder is not plumb but a second look shows that neither is the keel. A bent rudder stock can be repaired but the keel issue is significant. This keel could actually be pushed about 3" side to side. Inside we find that the rudder stock is actually bent but the real kicker is forward in the saloon around the mast step ................. At this point we'll have to jump inside for a moment to illustrate how you have to follow the dots and relate what you see on the outside to what is inside. |
 |
|
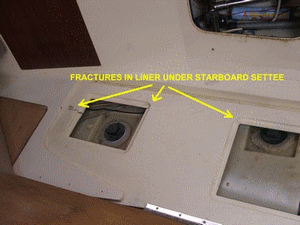
| Same boat ..... when we go inside and lift the floor boards we can see that the grid frame (integral to the liner) to right of the mast is not level. We see a wooden block (partially hidden by the mast) that was being used as a shim to keep the sole panel level. You can see fractures in the liner on both sides of the mast. Best of all we see that a 2" section has been welded on to the bottom of the mast. The mast support structure had been collapsing over time and when he couldn't tighten the shrouds anymore he lengthened the mast. The whole cycle started over and pretty soon he ran out of room on the turnbuckles again. Punch line - this keel was about to fall off ! |
 |
|
| Next boat..... Something is not halal (equal opportunity .. I've already used "kosher") about this keel so again we follow the clues found on the exterior and look around the interior keel support structure and find that the forward saloon bulkhead trim is about 1" higher than it's original position indicating that something has definitely shifted. Using my brass hammer around the keel on the exterior suggests the liner has separated from the hull. The broker did not have the sole panel fasteners removed as previously arranged so I never did get to inspect the liner in this area. Do not un-fasten sole panels without the owners permission. If you chip his teak sole while removing screws he will not be happy. Tip - if you proceed with a survey arrange to have these fasteners removed before the surveyor arrives because he (I) will not remove them. |
 |
|
| Next boat ..... Cast iron keel, stainless steel bolt and mild steel nut. Yes it left the factory this way ! This galvanic soup was doomed to failure the day it left the factory. Cost to repair this 25' sailboat - $15k Value of this sailboat in good condition - $2k Chainsaw rental $60.00 per day Wouldn't you be ticked off if you'd paid me $500.00 to find this for you ? |
 |
|
| Next boat ..... As you walk around the boat and start to focus on the trees, take a hard look at the drive system. The photo at right shows a loose prop nut and even worse (arrow) a heavily hammered bronze log. The log is being hammered flat by the propeller being slammed against it every time the throttle is pushed forward. It's unlikely that just a loose propeller could do this kind of damage so lets look inside ......... |
 |
|
| Same boat as above ..... We find a missing motor mount bolt, in fact there were a total of three missing bolts on this engine and I could push the engine back 2" by hand. Unless you are prepared to rebuild the engine bed this is a deal killer. On the other hand if this kind of work doesn't scare you .... squeeze the seller and go for it. |
 |
|
| Next boat ..... This trawler has obviously had the shoe between the keel and rudder added by less than expert craftsmen. Note the less than 1/2" space between the propeller blade tip and the shoe. No tip should ever come within 10% of propeller diameter to any other structure or cavitation damage will likely result. On this 28" prop, the space should be 2.8" not the 1/2" shown ............. This is a good example of finding one issue and backtracking to find all related issues |
 |
|
| Same boat as above ..... Cavitation damage is essentially caused by exploding air bubbles (that's another story) as you can see at right the tip is polished and is actually about 1/3 the thickness of the rest of the blade and will eventually disintegrate.......... |
 |
|
| Same boat as above ..... Yet another tree in the trawler forest ! The highly polished area of this shaft suggests once again that the motor is moving back and forth in its mounts as forward and reverse are applied. You can also see (arrows) that there is a space between the bearing and the shaft at the upper arrow and no space at the lower arrow. This means something is mis-aligned as the shaft should be centered in the bearing. Many boats flex considerably when in the slings, so the motor mounts and engine/shaft alignment should be re-checked with the vessel in water. |
 |
|
| Same boat as above ..... Inside we find loose motor mounts and as shown at right the stuffing box locking nut has no cotter pins and the shaft does not line up in the center of the nut. I think I'd want this stuff addressed before I parted with my hard earned money. |
 |
|
| Next Boat ...... Take a hard look at the cutless bearing. This one is snug but is seriously degraded and won't last long. On some boats this can cost a couple of hundred dollars and on others as much as a thousand. |
 |
|
| THE INTERIOR When you step inside, sit on the companionway steps and again look at the forest, get your nose twitching and sniff the air as odors are often a clue to a problem, but not in this case. This 40 yr. old sailboat looked pristine and even smelled good. An old yacht brokers trick is spray with ozone before the buyer arrives as this kills off any odors ..... temporarily |
 |
|
| Same boat ...... This boat is looking better and better, time to look at the trees so we must move the forest out of the way. Remove all the upholstery, open every hatch and locker, lift all the sole panels and now we find the sordid underbelly. PS. No surveyor will use tools to gain access to a compartment so make sure the owner or the broker have all fasteners removed from sole (floor) panels and any other fastened hatch before the surveyor gets there. If the fasteners had not been removed I would never have found ........ |
 |
|
| Same boat ..... This boat has a keel stepped mast and with the sole panels lifted we find the mast step supported by a loose wooden block jammed underneath and a steel I-beam that is so rotten that I pulled of the chunk of steel you see me holding. Repair cost approximately $15k Aren't you glad you found this yourself rather than paying me $700.00 to find it for you ? It is absolutely CRITICAL that all fasteners are removed from floor panels so you can see whats underneath. Get the owner or broker to remove all the screws. The surveyor won't do it or he will be responsible for any damage. |
 |
|
| Next boat ..... I lifted this photo from one of my survey reports and wish I'd kept a copy without the captions so I could have it framed. There were obvious signs of hull stress (multiple parallel fractures) around the keel so once more we need to take a closer look at the interior structure in that area. This fella re-bedded his keel but found it easier to work with great chunks of the structural liner cut away (some fool gave him a holesaw for Xmas). Originally the keel bolts would have come through the hull then through the liner to the nuts. Almost all of the strength in this boats is in the 3/4" thick liner, not the 1/4" thick hull. This guy now has 5000lbs. of lead bolted to a hull skin of about 1/4". Oh yeah ... notice he did not even use whashers let alone backing plates ! Don't stand under the travel lift when they pick this one up. |
 |
|
| Next boat ..... Look for the oddities. Notice that the frame member in the grid of this sailboat has a screwed on panel. This is not original and I have no idea why it was done as there was no indication of a problem on the exterior but it raises serious concerns about the structure that is holding a 2500lb lead keel in place. |
||
| Next boat ..... The example at right is a little obvious but some times it is much more subtle. Check around lower bulkheads for water stains and don't forget to look inside the lockers. If batteries, engine starter motors or anything electrical has been submerged the problems can come back to haunt you for a long time. |
 |
|
| Same boat .... If we had not lifted the floor boards we never would have seen these very crudely rebuilt frame members. |
 |
|
| Next boat ..... Under the cushions we find a number of fractures in the liner. this suggests that something is moving. Now is a good time to look at all liner/chainplate junctions for other signs of stress. When you see something like this, start at the flaw and slowly expand your area of inspection. There is rarely a single issue and you can often find a trail of related issues. This flaw on this particular model is not often a problem and has occurred due to inadequate venting of the water tank which expands when over filled and cracks the glass. On other models it can point to serious issues. |
 |
|
| HOLES IN THE BOTTOM ... Before I go up on deck I make a diagram of all the hull penetrations then use it as a reference to check the throughulls on the interior. I often find that there are throughulls that cannot be seen or reached from the inside of the vessel. I recently looked at a brand new, high end "picnic boat" that had 22 near water line throughulls and I could only access 11 of them from inside the vessel !!!!! |
||
| Bernoulli's formula - 2" hole @ 4' below
the waterline = 157.1 gallons per minute
! How many bilge pumps do you have ? The diagram at right is lifted from one of my survey reports, so make a little sketch with the locations of all the holes in the bottom of the boat that you can see on the outside. Make it as accurate as you can because occasionally you will find it extremely difficult to find the relative seacock inside the boat (if there is one - not good). Also mark any holes near the waterline as they too should have seacocks PS. Don't try counting holes from the outside if the boat is still in the water :) |
 |
|
| Next boat ..... OK we are standing in the forest and starting to look at individual trees (throughulls) which are basically holes in your boat. The throughull at right is a seriously UV degraded, cheap plastic part right at the waterline. I have seen as many as 18 below the waterline throughulls on a boat so you better be sure they are in good order cause if one of these breaks you are not going to save the boat with a crummy little 12 volt bilge pump that will never ever perform at its rated output (yet another story). |
 |
|
| Next boat ..... photo at right shows a plastic throughull, brass ball valve, different type of plastic elbows and all joints slathered with caulking. Two different plastics and one metal - all expand and contract at different rates, of course they are going to leak ! The hose on the far right is held into a plastic cuff by friction of ribs only. clamps are on the cuff not on the hose. Hose is bent putting strain on the cuff and a guaranteed slow leaker. |
 |
|
| Next ..... There are two major problems with seacocks in modern boats. One is the mixing of materials like copper, bronze, brass and chrome or zinc plated brass. The second is the mixing of threads on the fittings. Mixing metals increases the likelihood of galvanic corrosion particularly with the use of brass and chrome plated brass that most European builders use. Brass in particular will corrode rapidly if there is any stray current involved and will not last long in salt water if there is any galvanic current. A lot of builders are using cheap home type plumbing fittings and don't seem shy about mixing materials that will cause galvanic corrosion. I'll show you a few examples here but strongly recommend the the following links for more detailed information. Marinehowto.com - Quite simply the best "How To" online articles on almost all marine matters. Paul Stevens on Seacocks article #1 - A "must read" by an English surveyor with some scary photos. A followup on Paul Stevens article on Seacocks from Yachting Monthly article #2 Mr. Stevens also wrote Surveying Yachts and Small Craft which is a very good read. What you see at right is a real bronze seacock with a bronze lever. These thing are becoming quite rare as they are expensive. |
 |
|
| This photo from Marinehowto.com shows the problem of mixing NPT and NPS
threads. The throughull (left) is NPS,
the
coupler is NPT, The fitting at right
is NPT. Fitting an NPS pipe into an NPT coupler means only 3-4 threads will actually engage. Now imagine reefing down on a stiff ball valve with only a few threads engaged, the last two of which are barely in contact at all. Check out the Compass marine link, he has a great deal more information on this issue.. |
 |
|
| This photo from the first Paul Stevens article shows what
happens to brass in seawater, add a little
stray current and it can collapse in a matter
of days. Unless there are stray current issues, brass will likely last a long time in fresh water but if you are heading to salt water you'd better watch these things. |
 |
|
| Typical European plated brass ball valve
on plated brass throughull with brass elbow. It can be tough to tell if you are buying the right material but you should look for the following markings on any below the waterline fittings. "DZR" meaning "Dezincification Resistant" , "CR" means "corrosion resisant" or buy a product that clearly states on the package that it is bronze. |
 |
|
| Next boat ..... At least the last fella made an effort at seacocks, this guy didn't bother. If these hoses let go, the next survey will be done wearing scuba gear. Not only is this illegal, I suspect that an insurance claim may be difficult. Many surveyors object to these plastic hoses with fabric reinforcements but I have used them for years without any problem. Like anything else they do degrade over time and replacement is a part of general maintenance. However you must never use un-reinforced plastic hose below the waterline ! |
 |
|
| Next boat ..... Here is a good example of why I dislike cuffed hoses. Once again the clamps are on the cuff, not the hose. The hose is held in place by the ribs on the hose only and the hose is stressed by being bent. This is another constant leaker as you can see. Unfortunately many new boats particularly French sailboats have gone to this inadequate arrangement. I haven't seen one actually separate yet but leaks are not acceptable on my boat. |
 |
|
| Next boat .... There are only two places on a boat where double clamps are required by ABYC® Standards, exhaust hoses and fuel fill hoses. Here is a good example of how a second clamp can do more damage than good. The second hose is not over the nipple on this cockpit scupper and tightening it is actually pulling the hose off the nipple. In fact this is an old mechanics trick to get off stubborn hoses. Next heavy rainfall could see this hose come completely of .... another sinker ? According to BoatUS® most boats sink while tied to the dock. |
 |
|
| Next boat ..... Hoses - There are few things on a boat more neglected. I cannot stress this enough ... Squeeze every hose on the boat ! The wet spots on the hose at right appeared when I squeezed the hose. I immediately closed the seacock or I'd be dealing with another sinker. I think its kind of cute that he/she actually had tapered wooden plugs on hand. PS. wear gloves when squeezing head hoses, then smell the gloves. I changed all my waste hoses to ABS pipe with only 6" hose connections at the toilet and tank. The ABS will last forever and never stink. |
 |
|
| Next boat ..... Get into every compartment (like this one under the cockpit in a sailboat) with a flashlight and just sit for a couple of minutes and look around. The rudder tube at right (another hole in the bottom) is plastic sewage pipe held to the Original FRP (or part thereof) rudder tube with electrical tape. The transom has also been "re-inforced" with wood planking. I wonder why. Get out from under this cockpit right now ! |
 |
|
| THE ENGINE COMPARTMENT Next we move into the engine compartment, my favourite place and the most complicated area of any boat. On a simple sailboat installation I will just sit and look for about 5 minutes before I start to narrow things down. On a 50' trawler with twin diesels, 2 battery chargers, 5 battery switches, 8 seacocks, isolation transformer, two a/c units, AC generator, DC generator, engine driven hydraulics and 4 massive battery banks, I may just sit and look at things for an hour before I lift my pen to make notes. There are a thousand things can go wrong in the basement and you can spot most of them if you move slowly and are observant. When you are choosing a boat, choose one that has easy access to everything in the engine compartment. The harder it is to get complete access to everything in there, the less likely that the boat has been well maintained. Is the engine compartment clean and dry or do you have to wade through various unknown chemicals and petroleum products. Forget the wet decks and broken port lights, toxic sludge in the engine compartment is the deal killer for me. Nothing on a boat (or in life) occurs in isolation. Everything is connected, it's just a matter of connecting the dots. At first glance the engine below at left looks alright but once you start connecting the dots a very different picture becomes evident. A corroded turbo, swollen and soft hose on the crank case breather, cloudy reduction gear fluid, corroded nut and stud pulling through the exhaust flange, leaking oil pan gasket and a new impeller pump cover plate all point toward a significant overheating event. Not shown but the dates written on the oil filters from port to starboard were almost three years apart. Lots of red flags on this one and it's screaming for a full mechanical inspection including compression test, turbo inspection, gear and oil fluid analysis. Oil analysis is another topic and not always what it is cracked up to be. I suggest you read Oil Analysis On Diesel Boats for info on what you may learn and a few examples of actual oil analysis reports. |
 |
 |
| A full mechanical survey or a diesel engine
including compression testing is expensive
and many people are reluctant to go that
extra mile for any but the most expensive
boats. I am often asked if it is worth it.
Well the obvious answer is yes ! but ...
as you can see in the photos above, diesel
engines offer a multitude of clues just by
looking. If the fuel filters are clean, hoses
are in good order, clues like those above
are not evident and she starts with minimum
smoke, fuss. and runs well underload, the
chances of anything sigificant being wrong
are actually pretty slim with a disel engine. Gasoline engines also offer some visual clues but compression testing is so simple and inexpensive I always recommend it. |
|
| Next boat .... This engine compartment is exactly as it was when I opened the hatch. It doesn't look bad at all until you notice the can of Quick Start. This is a major clue that this engine has some starting problems. This stuff should never be used in diesel engines as it will ignite before the diesel fuel and may try to send the piston in the opposite direction before it has completed its stroke. Get yourself a big magnet and you may be able to retrieve the piston from the bottom of the lake. |
 |
|
| Next boat ..... Coolant - Next remove the pressure cap on the heat exchanger. In the photo at right you'll notice there is no coolant. This could be a serious problem. Where did it go ? You might want to check the oil next. If it is somewhat milky don't bother calling me to do a survey. |
 |
|
|
Next boat ........... Coolant - Stick your finger in the heat exchanger. If it comes out with that brown stuff we call rust move on to your 2nd choice. |
 |
|
|
Next boat ..... Coolant - From the heat exchanger move on to the coolant overflow reservoir. Like the heat exchanger you should find some clean translucent red or green fluid. If you come up with mud .... move on to your 3rd. choice. |
 |
|
| Next boat ..... Coolant If you come up with dirty black oil in the coolant reservoir, move on to your 4th choice. I usually use the coffee stir sticks for checking fluids then photograph but the black finger was more dramatic. Let's see that's 3 surveys you didn't have to hire me for, you've saved $2,100.00 and you haven't even left the house yet ..... You owe me a beer. Don't forget to check the oil and the gear reduction fluid.Take off the oil filler cap and look at the underside sometimes water in the oil will show up as condensation on the cap. Pull the dipstick and if the oil is milky or grayish walk away. To learn more about oil take a look at Oil Analysis, Worth While ? |
 |
|
| Next boat .... Check the oil and gear reduction dipsticks. This engine dipstick clearly shows beads of water or coolant. No oil analysis required .... most likely a rebuild is required.. |
 |
|
| Next boat .... This gear reduction unit dipstick clearly shows corrosion and mud. This transmission is toast. You clearly did not need a fluid analysis to find this issue. |
 |
|
| Next boat ..... Just like the hoses on all the throughulls, you should squeeze all fuel, waste or A/C hoses you find in the engine compartment or anywhere else. The hose at right being penetrated by my thumb is a gasoline fuel fill hose. I'm sure even the most technically handicapped layman can see how dangerous this is. I think I was the first person in 10 years to open this deck plate and look at the hose. |
 |
|
| Next boat ..... The owner attempted to seal the fuel leak on this polyethylene tank with some sort of caulking ... it didn't work.. |
 |
|
| Next boat ..... Two gasoline fuel lines with fractures jammed together with battery cables. Scary stuff !. Fuel filters - Photos below show the importance of a very close look at the fuel filters, dirty fuel will shut you down in a hurry and it can be very expensive to get contaminated fuel out of your boat and disposed of. If there is a lot of water in the filter and has been there for some time, chances of internal tank corrosion are high.. |
 |
|
 Why is there air in this filter, this engine is not going to run for long. |
 With an inch of water and sludge in the filter this one wont run for long either. |
 A fuel filter this rusty, what else didn't he maintain ? Think he's changed the oil in the last 10 years ? |
 Water, waxy layer, cloudy fuel |
 Clean un-dyed fuel |
Clean red dyed fuel I'll add a photo here when I dig one out of the files |
| Photos below ..... Close examination of fuel tanks is often extremely difficult but the photos below show why the effort is justified. Sometimes I can't even get my snake camera into areas that are most suspect. None of the corrosion shown below was readily visible but I did manage to shove a camera into those spots on these boats and shoot blindly ..... these are what I got. | ||
 I could'nt see the bottom of the tank ... |
 but I could feel it ! |
 Snake camera photo of underside of same tank |
| Next ...... Air filters - Many filters are contained in some sort of metal box, open it up and look inside. If the filter element is rotten and oil soaked like the photo at right I suggest a full mechanical inspection. |
 |
|
| Next ...... On gasoline powered boats take a close look at the spark plugs. The one shown at right had not been removed for many years and is a prime example of why I stopped doing compression tests in surveys as it could be an entire day to get a broken spark plug out. Chances of getting this out intact are slim. |
 |
|
| Next boat ..... Many older power & sailboats and some current power boats have engine beds (stringers) made of FRP over wood. I broke the stringers at right with my fingers ... yup, that's what the engine was bolted to. Get your hammer out and whack the engine beds and any other stringers. You will quickly be able to detect the sound of rotten wood under the FRP (fiberglass). Even more so if your hammer penetrates the stringer. On many of these boats the engines are secured with lag bolts into rotten wood, a less than optimum arrangement. Sometimes the bolts go into steel or aluminum plates embedded in the wood but if the wood rots they become free floating. |
 |
|
| Next boat ..... The motor mount on the left looks fine. The one on the right (same engine) is badly compressed. The chances of aligning this engine with the shaft are slim. If you see something like this, there is a good chance of a badly worn cutless bearing and in extreme cases, transmission and or shaft coupling damage. Take a close look at all motor mounts for signs of movement. |
 |
|
| Next boat ..... Follow the water intake from the seacock to the engine and you will find the raw water pump. Inside this pump is a rubber impeller that pulls water in to cool the engine. You can see the blades on the impeller at right are bent to varying degrees which is the way it's supposed to be. The problem comes over time when this stress begins to fracture the rubber. If this happens you can have as little as 2 minutes to shut your engine down or your next trip will be to your friendly diesel engine dealer. |
 |
|
| Next boat .... You won't be opening this pump to check out the impeller but take a close look at the pump body. The 6 year old pump at right does not have a single mark on the cover plate bolts, in fact the original factory paint over the bolts is not even cracked. This pump has never been opened ! The impeller should be removed for evey layup period to allow the rubber vanes to relax back to their natural position. Depending on how you use the boat you should never go more than 3 years without changing the impeller. |
 |
|
| Next boat ..... Same problem, the bolts on this cover plate had never been removed and the pump body is badly scorched. This pump has been seriously overheated and significant engine damage is a possibility. |
 |
|
| Next boat ..... These are failed impellers. Even if the impeller looks good, change it every couple of years. I have seen brand new units that had been sitting on the shelf for a few years fail in seconds because the bond between the rubber and the bushing had failed. This pump is a critical part of often neglected routine maintenance. |
 |
|
| Next boat ..... See the soot at the exhaust elbow, this is an exhaust leak from what turned out to be a crack in the elbow. $40.00 to weld it. Carbon monoxide poisoning if you don't. Take this one seriously as CO poisoning has virtually the same symptoms as sea-sickness. Some will tell you that diesels are not a CO threat but they don't realize the effects of CO are cumulative. For more info check out CO Poisoning On Boats.. |
 |
|
| Next boat ..... The patchy looking FRP at the pipe junction (blue arrow) is not a problem it's just the more shape conformable mat they use. The lateral line (yellow arrow) is a serious but easily addressed issue. That line is a crack in the muffler that has been patched with black caulking. More CO poisoning potential. |
 |
|
| Next boat ..... This improperly placed second clamp is on an FRP exhaust tube is actually forcing the hose off the pipe. The leak stains are obvious and we have another CO potential. |
 |
|
| Next boat ..... This improperly placed second clamp is on a steel exhaust pipe that is cracked. You can see that the hose is pulled back from its original position by where the paint stops. The first clamp isn't too well placed either. This boat is going to the bottom if not fixed prior launch. Your choice CO or drowning. |
 |
|
| Next boat ..... I am not a fan of V-drive installations on sailboats (engine faces stern with V-shaped transmission) as it is extremely difficult to see the stuffing box let alone inspect or maintain. The photo at right was taken with my snake camera and I could not physically reach the stuffing box hose to see if it was as bad as it looks. The only way to check this or replace it is to remove the engine. pretty poor engineering. |
 |
|
| Next boat - This stuffing box hose is so old and has been contaminated with oil, fuel, coolant and who knows what over the years and has now turned to jello. I can't emphasize enough, squeeze every hose on the boat. |
 |
|
| Next boat - This flange type stuffing box has both clamping bolts bent. Wrong size ? Wrong type ? This definitely requires some investigation. |
 |
|
| On I/O boats you want to grab the drive and shake it
from side to side, there should be very little
free play (1/4" is acceptable) otherwise
chances are good the gimbal bearings are
gone, fixable but not cheap. Apply as much
force as you can and try to move the drive
up and down, you should not be able to budge
it. Have the drive powered full left, right,
up and down so you can get a look at the
rubber exhaust and drive bellows. In most configurations a crack in
the exhaust bellows is not a big deal
other
than indicating that maintenance is
questionable.
A crack in the drive bellows. even
a faint
hairline fracture, even if you only think their might be a crack, insist that it be changed
as this could be a sinking issue. The bellows
should be pliable. If they are hard or brittle
fractures will soon follow. You'll need your
mirror and flashlight to see the bellows. Notice the unpainted border around the drives, we'll talk about this below. |
 |
|
| Photo at right - Notice that the lower unit (fresher paint)
appears to have been changed and that the
bottom paint is in contact with the drive.
Now compare that to the boat above which
has a 1 1/2" unpainted border around
the drives. Why ? Many bottom paints contain
various metals and when put in contact with
the different metals of the drive unit you
create a galvanic cell which may result in
galvanic corrosion of the drive. In fact
i/o manufacturers will void your corrosion
warranty if your bottom paint touches the
drives. This fella will be buying another
lower unit in a year or two. Read more about Electrolysis, galvanic and stray current corrosion |
 |
|
| Next boat ...... Anodes - Calling them "zincs" is mis-leading because they may be zinc, an aluminum alloy or magnesium and installing the wrong ones is a waste of time. Don't just grab what's on the shelf, get the proper anodes. Most will tell you to replace the anodes when they are 50% wasted but this is not good enough. Your anode may show no wastage or very little because it is not doing it's job. Another critical factor is electrical continuity between the anode and the metal it is supposed to protect. So set your multimeter on ohms and make sure you've got very low resistance between the anode and the metal it's attached to. 0.0ohms is perfect but something less than 1ohm is acceptable. "O.L" (open line), this means there is no continuity between the anode and shaft, therefore no corrosion protection. Its not good enough to have a shiny anode on the exposed surface, the mating surfaces must also be clean. In fresh water this is not usually much of an issue of shaft drives but can be a major issue on i/o drives and saildrives where all the different metals involved can create an active galvanic cell.. |
 O.L = Open Line meaning no continuity |
|
| ELECTRICAL SYSTEMS ..... Now let's play with electricity, unless you are English, my experience with Jaguars, Triumphs and Austin Healey's have convinced me that English people should not be allowed to play with electricity. These systems generate more comments in my surveys than anything else. They are neglected, abused and modified by amateur electricians (or electrical engineers) who can create lethal conditions in a matter of minutes. I'll also show you some simple tests with your new multimeter which if completed will give you about a 98% assurance of the vessels electrical integrity. There are a lot of if's, ands, or's and but's in the following tests but we are going to leave those to the ABYC® certified electricians and assume a basic 120volt shore power system. Some of the if's/or's include 240volt systems, generators, isolation transformers, dual pole branch circuit breakers and inverters etc. If any of this goes over your head, forget about it and leave it to your surveyor. If I see something that is beyond me I don't hesitate to recommend an electrician be consulted. |
||
| Next boat ..... Look at the shorepower cord. Is the insulating cover abraded or brittle ? If so replace it. See the little weld spots on the contact at right, that is caused by arcing i.e. electricity jumping across a small space, this will generate excessive heat and will melt down at some point..... replace the cord. Never unplug a cord without opening the main circuit breakers As you wiggle the cord loose arcing will degrade the contact points and send your battery charger into a fit thereby shortening its life. |
 |
|
| Next boat ..... The boat end of this cord is even worse. Poor contacts, loose contacts and just general aging can make these cords dangerous. This one's life is over, get rid of it. |
 |
|
| Next boat ..... This one went off in my hand while I jiggled it to see if it was tight. |
 |
|
| Next boat ..... With cords like those above you are playing with your life. For $75.00 get a new one. |
||
| Next boat ..... Polarity is more important than most realize and very easily checked with a cheap three light tester. If the polarity is incorrect you could easily electrocute yourself working on an appliance because the neutral would be live even with the branch breaker open. Standards require a double pole main breaker or a single pole breaker with a polarity indicator on incoming AC. Depending on where the reversal is you may be playing with live wires even though you turned of the branch circuit breaker. Reversed polarity whether at the panel or downstream outlets with a ground fault can cause overheated wires and poses a fire hazard. This condition can also indirectly contribute to "electric shock drowning". Buy the tester with the G.F.C.I. test button (red button on tester at right).and you can also check if the outlets downstream of the G.F.C.I. are protected as they should be. As few boats are fitted with double pole branch breakers, You must test each and every outlet on the boat. |
 |
|
| IMPORTANT - There are a few important caveats for
the following tests using your multimeter. 1. The shore power should be disconnected at the pedestal. 2. All AC breakers must be on (closed). 3. If an inverter is on board it must be turned off. 4.. If a generator is onboard the selector switch must be set to "shore power". 5. When checking resistance or continuity it matters not which probe is used for ground or neutral. |
||
| Neutral Ground Bond. This is absolutely critical as neutral/ground
bonds are a key contributor to "electric
shock drowning". This can get complicated
so I'm really going to simplify and advise
you to read up on Dave Rifkins website if you want more detail Except at generators and inverters where switching is automatic, the neutral (white) and ground (green) wires should never be joined on the boat. This practice may be acceptable at a home panel but your home does not have a DC system connected to the same ground and it does not sit in water (normally). Unplug the shore power, turn on the main breaker, set your multimeter on the ohms function and insert a probe (red or black probe is irrelevant for this test) in the neutral (biggest) slot and one in the ground slot. |
||
| Neutral to Ground test - As in the photo at right. If there is no G.F.C.I. in the circuit you should see a reading of "O.L" (Open Line) indicating there is no contact and this is as it should be. |  Red probe in neutral, Black Probe in ground |
|
| As in this photo at right. When testing a
GFCI protected circuit, ABYC standards require
that you see a reading of more than 25,000ohms.
This has to do with the G.F.C.I. itself).
If all is well you will likely see a reading
in kilohms or megohms (photo at right). if
you see something in "ohms" range
stop immediately and call an ABYC® certified
marine electrician. |
 Red probe in neutral, black in ground |
|
| This photo shows a neutral / ground bond
with continuity of 34.6 Ohms . THIS IS LETHAL
!!!!!! I see about ten boats per year like this and have no idea how many people its killed. This outlet is a GFCI and should show at least 25,000 Ohms or 25 Kilohms. If the boat AC and DC grounds are bonded as they should be this boat will be sending AC current directly into the water. |
 Black probe in ground, Red probe in neutral |
|
| More on grounds and gasoline. Unplug the shorepower cord from the pedestal (leave boat end connected) and drag the cord plug inside the boat. With your meter still on the ohms function touch one probe to the ground prong on the shore cord and the other probe in the ground opening in an AC outlet. Now repeat that process on every AC outlet on the boat. Also touch a probe to the fuel fill fitting, gas tank and engine. It is crucial that these points have good grounds as sparks and gas mix rather well (depending on your point of view). Testing these items will also confirm that your AC and DC grounds are joined. Joining AC and DC grounds is a controversial subject as this may create another avenue for corrosion, however ABYC's position is that your life is worth more than a little corrosion. if someone disputes this tell them to watch this youtube video explaining the death of Lucas Ritz. Good grounds are critical to your safety. A good ground should show something less than 1ohm. |
I'll add a photo here when I come across one that fits |
|
| Next boat ..... Transport Canada construction standards prohibit AC and DC from sharing the same panel (builders say so what ?) but many new boats sold in Canada are built this way. ABYC® standards say they can share a panel as long as they are clearly separated and tools must be required to gain access to the AC side on the back of the panel. If done properly I don't really have a big problem with sharing but ..... I also believe volt meters and ammeters on both AC and DC sides are critical .... don't see one on this panel though. |
 |
|
| Next boat ..... Unfortunately the builder of this new boat did not separate the AC & DC sides (required by Transport Canada and ABYC®) and obviously there are no tools required to gain access to the AC side. some AC and DC conductors are bundled together. This type of shoddy work is quite common on new boats. Even though the system at right is quite neat, imagine what it will look like in 10 yrs after many different people have played in this sand box and added lines for a/c, extra outlets, new nav stuff etc. It ain't gonna be pretty and sure won't be safe. If the choice comes down to two boats, lean towards the one with separate panels. |
 |
|
| Next boat ..... This is the back side of a shared panel after a few years and a few owners mucking about in it and makes a very good case for separate panels or at the very least some form of separation of protection from loose (and conductive) gear lying up against it.. |
 |
|
| Next boat .... If you look closely at this melted outlet you can see the conductors are solid copper wire rather than stranded. Solid copper wire is fine in your house which does not vibrate at 3200RPM in harmony with your Yanmar but solid copper degrades over time from vibration. Most boats were fine with this for 10 years or so but as this stuff ages it can be a hazard to your family. Take a look at the cable, if it does not say "600 volt" & "boat cable" it should be replaced. If it's very stiff and difficult to flex, chances are it's solid copper. Also note (lower right corner) the garage sale breaker panel without a polarity indicator or volt meter. |
 |
|
| Next boat ..... Some of the older boats came without AC panels and people added their own like this fuse box someone found in a dump. These might be fine in you workshop at home but not in a boat. Again vibrating at 2800 RPM right along with your old 1 cylinder Yanmar or Gasoline powered Atomic4 these fuses will come loose and start arcing. Another prime candidate for a melt down if not a fire. Curiously I mostly find most of these in gasoline engine compartments which makes them a triple threat due to the potential for arcing. |
 |
|
| Next boat ..... This 2009 42' trawler came straight from the factory like this. An outlet without a junction box ! Any short in this outlet is going straight to the wood, another potential fire. Almost all Taiwan boats are built this way. |
 |
|
| Next boat ..... Another electrical genius at work installed this main breaker without polarity indicator, ammeter or volt meter. Notice the blackened areas on the cord. Obviously something is overheating this cord .......... |
 |
|
| Same boat as above ...... This is a close up of the breaker. Note that it is a 60amp breaker on a 30amp line. Running the water heater, air conditioning and microwave at the same time will vaporize this cord long before the breaker trips |
 |
|
| Next boat ..... By law any electrical appliance (including fuses, starter motors, alternators, switches etc.) in a compartment containing gasoline must be inherently ignition proof or certified as ignition protected. Sparks and gasoline fumes are a bad mix. . The fella at right got this unprotected water heater from a big box store and stuck it next to a gasoline engine ... BANG ! This goes for battery chargers, inverters, AC outlets and anything else that can spark. Any electrical appliance or fixture in a compartment containing gasoline must be ignition protected. |
 |
|
| Next boat ........ Rules for batteries are fairly straight forward .... they are not supposed to fly around the engine room, the electrolyte (sulfuric acid) they produce must not be allowed to spill into the boat, positive terminals must be protected (rubber boots), wing nuts must not be used, positive cables must have a fuse (except for the ones going to a starter motor). Neither chargers, inverters or un-protected fuel lines may be above batteries and they must have ventilation to the outside due to the hydrogen they produce while charging. I know this seems like a lot but its really quite simple. Sit quietly and look over the system as a whole before trying to nail down this list. The disaster in waiting in photo at right is an all too common battery installation.. |
 |
|
| Next boat ....... The battery at right is not in a plastic box (plywood is no good) to capture spilled acid. The hydrogen produced while charging is not only highly explosive but extremely corrosive and will go right into that generator mounted over the battery, The battery is not secured at all so when this boat hits a 2' wave and that unprotected positive terminal comes in contact with the generator just above it .... massive fail ! |
 |
|
| Next boat ..... Eight golf cart batteries = 1800amps + one group 31 battery at 900amps equals 2,800 amps of hydrogen generating, sulfuric acid producing explosive power in a plywood box inside the boat without any ventilation, no fuse protection, no rubber boots on the positive terminals and an undersized and non-ignition protected battery charger in the same compartment. Sealed (AGM or Gel) batteries are not exempt from these requirements. He was very proud of this installation .... I condemned it. |
 |
|
| Next boat ..... The stained wood under the red battery switches is sulfuric acid leaking from the batteries under this dinette bench, they are not in plastic boxes, the positive terminal are not protected and as you can see by the little wooden grille, the hydrogen is being vented right into the cabin. Oh yeah .... the acid is dripping through the deck on to the hull below and eating through the fiberglass. |
 |
|
| Next boat ..... Take a close look at the batteries. Even moderate size sailboats often have 4-5 of these and they can be expensive if you buy good ones. (don't buy cheap automotive stuff). This one at right had boiled dry and the heat and expanding gas has swollen the side of the battery case. This battery will die in short order and could explode if charging continues when it has lost all its electrolyte. If you see a swollen battery or smell something like burning urine when its charging...... don't ask me how I know just get it off the boat. This is why batteries must be in a space that is ventilated outside of accommodation spaces and why neither chargers, inverters nor fuel lines may be mounted over batteries. Never replace only one battery in a bank as the older ones will drag the new one down to their level Always replace the entire bank. |
 |
|
| Next boat ..... It is an ABYC® requirement that all batteries be contained in acid resistant boxes or trays. I often get told that this is not required for AGM batteries. I show them this photo ..... I wonder where the acid went ? |
 |
|
| Next boat ..... Remove every cap on the batteries and ensure there is electrolyte, The one at right is bone dry and an explosion candidate. |
 |
|
| Next boat ..... This gasoline fuel hose which exhibits some fine fractures is abrading against a non-ignition protected battery charger. |
 |
|
| Next boat ..... This bilge pump is obviously not working. Could it be because of the electrical connection made with tape sitting in bilge water ? Make sure any conductors in the bilge are secured above the normal accumulation of bilge water and make sure all connections are made with waterproof connectors. |
 |
|
| Next boat ..... This gasoline engine (15hp OMC saildrive) is vented into the cabin of this sailboat (little louver in front of the engine), the non-ignition protected battery charger is in the engine compartment and plugged into an AC outlet which by it's nature is not protected, The AC conductor is lying on the engine, some AC connections are not in sealed junction boxes but made with wire twist connectors wrapped in electrical tape and there is a leak in the exhaust hose. |
 |
|
| Next boat ...... See the red battery switch ..... one of the first things to do if you have a fire in the engine room is turn off the batteries, the last thing you want to do is open the engine compartment to get to the switch. Also note that the non-ignition protected charger is mounted over the batteries and on top of an unshielded fuel supply line. The batteries are in plastic boxes but those cheap plastic straps are a poor method of securement. Ventilation of gasoline engine compartments is very simple but absolutely critical and is deserving of it's own article Gasoline Engine Compartment Ventilation Safety |
 |
|
| Next boat ..... Another topic that deserves special attention and its own article is one of my favourite, propane ! Propane is a very safe fuel if the system is properly installed. It's a very big if. The photo at right shows a "custom" propane storage locker inside a gasoline engine compartment. If you are considering a vessel with a propane installation, please, Please, PLEASE read Safe Boat Propane Installations |
 |
|
| Sailboat Rigging - I do not have an extended health care plan, dental plan, disability insurance or pension plan and do not go up masts. For a proper inspection you can either drop the stick or rely on my binoculars. I have on a number of occasions found serious issues that would not otherwise have been noticed without my binoculars. Next boat ... if you see a turnbuckle that is "blocked" like the one near right or "open" like the one on far right, there is something wrong as neither situation has any room for adjustment. Further investigation is advised, particularly around the base of the mast and at the spreaders. |
 |
|
| Next boat ....... This boat was in the travel lift and just about to be launched. Link to USCG rigging inspection article |
 |
|
| Same boat as above ...... Binoculars and a 14x zoom lens caught this clevis pin securing the forestay that had about 1mm to move before letting go. A mast coming down that way is not good for boat or crew. |
 |
|
| Next boat ..... Mast and sleeve joint on a Nonsuch mast. Loose bolts and a crack = about $60k. Don't forget your binoculars. |
 |
|
| Next boat ..... This is the custom made stainless steel gooseneck on a racing sailboat. I'd want my money back for this truly amateur weld. |
 |
|
| Same boat ..... As I pushed on the boom that crappy weld let go. Fortunately the owner didn't hold me responsible. Beware of amateur repairs. If it doesn't look right it probably isn't. |
 |
|
| Next boat ..... Sailboats should not be stored on the hard with their masts up. period. The crack in this masthead fitting would not have been seen with binoculars had the mast been stepped. Very few surveyors will go up a mast as we don't have dental plans, drug plans, pensions or any other health benefits. |
 |
|
| Next boat ..... Take a look at all connecting points on rigging. The captions my friend Jay Stormer put on this photo says it all. This is a patch job that will not last and makes one suspicious of every piece of rigging on the boat. |
 |
|
| Next boat ..... Another shot from Jay. I have never found it necessary to discover cracks in stainless rigging with dye testing, a magnifying glass has always been sufficient . Lower terminals like the one at right tend to fail before the uppers since dirt can wash down the wire into the swage. Stainless steel corrodes in the absence of oxygen so the dirt builds up and holds water which becomes stagnant (de-oxygenated) and things corrode from the inside. The very obvious crack in this terminal shows that it must be replaced. It is advisable to change the entire shroud rather than patching in a new terminal to old wire. |
 |
|
| Next boat ..... By the time you see a deep pit like this one in a shroud toggle it is too late ............ |
 |
|
| This is the result This would be catastrophic in a 20 knot blow. |
 |
|
| Next boat ..... The tight fitting vinyl tube over this shroud has trapped a lot of moist dirt. Wet dirt, De-oxygenated moisture. Corroded stainless. Rigging failure. Get rid of these things. |
 |
|
| Next boat ...... Large areas of chainplates on many boats are not accessible for inspection whether behind built in cabinetry inside the boat or embedded in wood like the one at right. Remember stainless corrodes from lack of oxygen. In fresh water this will not usually be a problem in your lifetime but in salt water, designs like this are beyond dumb. This plate is in continuous contact with damp wood which is really bad for stainless. Now throw in a little salt and it may not take long to create a dangerous condition. So what if your rig falls down look at all the money you saved by buying that ex-charter boat. . |
 |
|
| Next boat ..... What you see on these chainplates looks like minimum surface corrosion but the stainless is rotten on the inside. Also note the elongated holes, this plate has been stretching. Many riggers advise pulling plates every 7-10 years for inspection if in salt water and about 15yrs. in fresh...... I have never seen it done ...... until after they break. |
 |
|
| Next boat ..... The owner of this boat was incensed when I condemned all his chainplates. My client (buyer) wisely walked from the deal. The owner cleaned the plates with some abrasive and took all the surface rust off. They actually looked not bad except if you looked really closely you could see a great many near microscopic pits. What's so bad about microscopic pits ? Read on, I'll get to it. |
 |
|
| Next boat ...... This fella tried to stop his chainplates leaking by covering them with FRP. All he managed to do was create the perfect environment for corrosion. A number of 70's and 80's boats were built this way so take a hard look for any brown weeping stains. The factory boats built this way often have the FRP so thick that neither the hammer or moisture meter are of any use. Marine Survey Checklist. After studying Marine Survey 101, I suggest you print this checklist and take it with you for your boat inspection. It will help keep your self-survey on track. Sea Trials It ain't just another boat ride. Sea trials from a surveyors perspective. And now that you have all this down pat, perhaps you'd like to know How To Become A Marine Surveyor. |
 |
|
| So if you made it this far you may have found some value in my tips. I don't think you want to print this off and carry it around so I made up a printable checklist that you can take with you on your next inspection. It is laid out to help organize your thoughts and hopefully help so that you don't miss anything. | ||
| I have posted a number of Sample Marine Survey Reports, my own and from a few other surveyors.
We all do things a little differently to
take a look to see what you should or could
expect in the way of a report. Listed below are three very good links for those who want to know more about rigging inspections After investigating a number of catastrophic failures and some fatalities the USCG put together this Guide to Rigging Inspections. Lewmar put together a very good step by step to Winch Servicing. Navtec put together this Guide to Rigging service Not everyone agrees with what I have to say here so like everything else online, take it all in, weigh it, chew it and spit out what you don't like. Stoopid Boat Tricks by Builders, All the stupid things builders do and whether or not its worth surveying a new boat. Stoopid tricks by Boat Owners, Perhaps even worse than what the guilders do. |
||
|
Once you have the boat, the best advice I
can give you is a link to this website
of
Marinehowto.com articles. They are without a doubt the best
online resource for anything you want
to
tackle on your boat and cover just
about
everything. I strongly disagree with
his
position on moisture meters but the
rest
of it is impressive. Don't waste money on a moisture meter to aid in boat buying, just accept that all older boats will have some moisture in them and that if the issue is enough to make you walk from the deal, then it will be obvious by other means discussed above. Check out Moisture Meter Mythology and Moisture Meters on Boat Hulls. |
||
 |
||